This manual will help you understand how the MarketMonitor bot works, which is equipped with various crypto exchange screeners. The bot is capable of opening positions on the futures market and buying coins on the spot market in both manual and automatic modes.
Important! In the free version, only manual retrieval of information for the required ticker is available to you (more details below). Intra-exchange screeners and auto-trading are provided under available subscriptions. If you are a beginner in trading, it is recommended to first study basic exchange concepts and try trading manually before purchasing a subscription and mastering the bot interface. Intra-exchange screeners have flexible settings and allow you to filter data by various parameters: coin names, capitalization, price change, volume, open interest (OI), RSI, and funding. The bot is under active development, so some functions may not yet be described in the instructions. Currently, it scans 8 exchanges: Binance, Bitget, Bybit, Mexc, Okx, BingX, Kucoin, and Gate. Intra-exchange screeners and trading are supported on Bybit, Binance, OKX, and Mexc (the trading API on the exchange side has not been implemented here yet). Exchange data is updated in real time via WebSocket streams, and order tracking is implemented through them as well. This allows the bot to react instantly to all events occurring on the exchange.
Let's move on to the settings:
A Brief Introduction: How to Use the Bot Correctly?
It is no secret that the world today is a rather unstable and constantly changing place, making it difficult to control and even harder to predict using fundamental analysis. Most crypto traders have felt the impact of recent events on their own wallets (shout out to everyone who got liquidated during the attack on Israel in April 2024—the author was right there with you). In such conditions, relying on complex indicators like Elliott Waves, Bollinger Bands, Ichimoku Clouds, or MACD often feels like playing at a casino.
In our bot, we focus specifically on current exchange metrics, such as:
Price, Open Interest (OI), Volume, Funding, and Liquidations. By comparing these and applying filters (like RSI or Market Cap), we try to forecast future coin movements based on simple analysis.
For example:
Price jumps, but OI and Volume drop? This means long holders are closing positions and taking profits—a potential short opportunity.
Price rises along with all other indicators? We are likely looking at an upward trend—a potential long opportunity.
Daily RSI is over 90%, hourly is at 40%, and funding is skyrocketing? The coin was heavily pumped in previous days and a correction is starting—consider opening a short on the next minor pump.
I intentionally do not provide specific values because markets and coins behave differently every day. And, of course, we cannot ignore frequent market manipulations, where a "whale" with tens of millions of dollars can ruin all our analytics with a single click—just because they didn't get enough sleep.I should emphasize that I highly recommend using filters (by market cap and coin names). Do not trade everything at once; it is impossible to apply a single strategy to over a thousand different coins. In my own strategies, I trade 5 high-liquidity coins, and some successful traders focus exclusively on just one!
Additionally, the bot offers flexible settings for managing current positions, such as:
Grid Take-Profits for partial profit fixing.
Moving Stops to Break-Even (BE) after partial profit.
Position Add-ons and flexible Averaging Logic.
Combined, these features provide an excellent tool that handles all the "dirty" exchange work for you. Finally, I would like to wish everyone success and profitable trades. I'll also share a small set of rules that I have developed for myself during my time in trading.
After pressing the /start button, a keyboard with two main sections will appear.
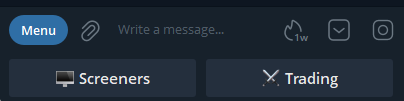
The Screeners section provides access to screener settings across multiple exchanges. These screeners monitor the markets and send signals that meet your specific parameters. Essentially, they act as your "eyes" on the market, helping you avoid opening positions blindly and instead wait for the perfect setup. The key advantage over any competitors is the availability of 8 different screeners, each with its own filters, as well as the ability to set unique configurations for different exchanges. Additionally, you can receive cross-exchange signals (price discrepancies, funding rates).
The Trading section allows you to link API keys from all available exchanges, configure entry parameters (supporting both long and short positions, which can be opened simultaneously), and execute trades using market or limit orders immediately upon receiving a signal—either manually or automatically via the bot.
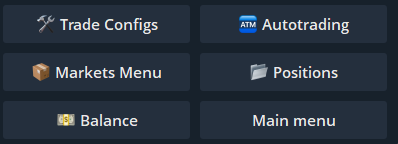
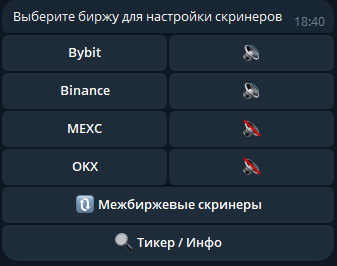
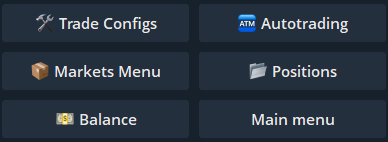
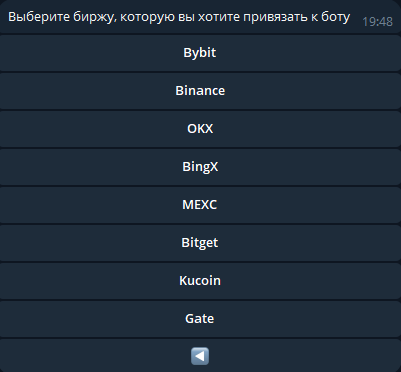
After clicking the button to select an exchange, the Main Menu will open. It contains several sections that we will examine in more detail below:
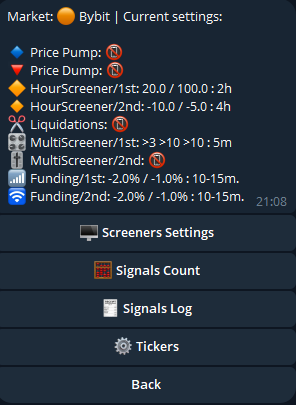
Important Note: Please consider all screeners not only as user signals but also as triggers for the trading bot to open new positions.As mentioned earlier, screener settings and ticker filtering vary across different exchanges. For this example, let's focus on Bybit, one of the most popular exchanges. Select it from the main menu and click "Screener Settings." You will see 8 screeners where you can independently configure core parameters (on the left) and specific filters for each screener (on the right). Now, let’s go through each screener individually to see how to set them up.
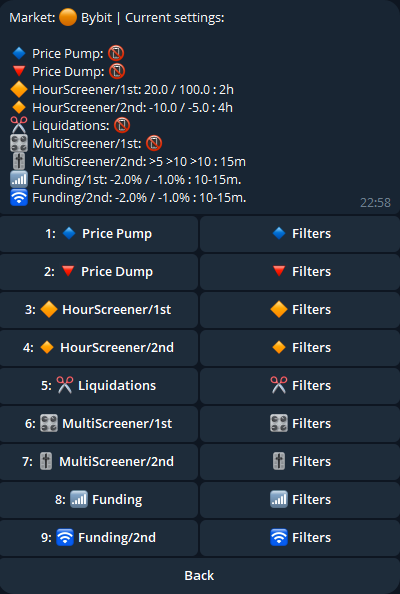
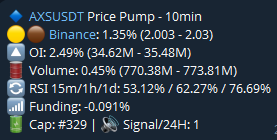
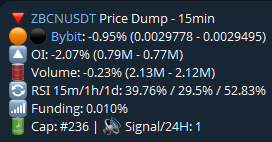
The first pair of screeners are 1-minute scalping screeners that identify price pumps and dumps over short periods ranging from 1 to 30 minutes (data is updated every 3 seconds).
Let’s look at the Pump screener as an example for signal configuration:
First, set the required growth range by defining lower and upper thresholds as percentages, separated by a hyphen (-).
Then, after a space, set the time period in minutes.Example: A setting of 1-3 5 will send all tickers where the price change over a 5-minute period falls between 1% and 3%. The configuration for Price Dumps is exactly the same, but the search will focus on price drops instead.
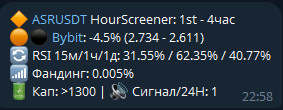
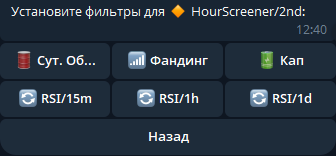
The second pair of screeners, HourScreener, also monitors price movements but on a larger timeframe — from 1 to 24 hours, with data updated every minute.
The configuration is similar, but it uses negative values (meaning you specify whether you want to receive signals for dumps or pumps).Example: A setting of -10 -3 3 will send all tickers where the price change over a 3-hour period falls between -10% and -3% (indicating a drop). You can configure one screener for pumps and the second for dumps; the choice is entirely yours.
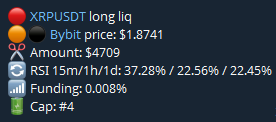
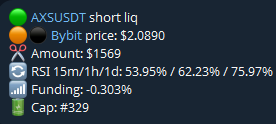
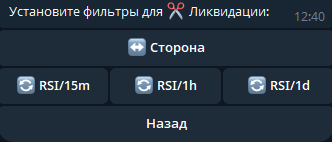
Trading based on forced position closures, or liquidations of other traders, is also a popular strategy. This screener stands out from free alternatives due to its customizable notification thresholds, which prevent the interface from being cluttered with minor liquidations. Additionally, you can filter for specific types of liquidations—such as only Longs or only Shorts - and set unique thresholds for each direction.Since settings are saved individually for each exchange, you can easily manage your alerts: for example, you can set higher thresholds for Binance (which has significantly more liquidity and higher liquidation volumes) and lower thresholds for Bybit.
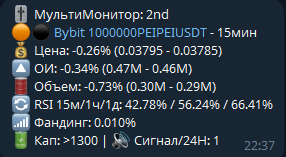
These two screeners operate based on multiple exchange data points: price changes, Open Interest (OI), and volume. Unlike others, they are configured using boundary thresholds and mathematical signs (> and <) rather than ranges.
Example: A setting of >5 >5 >10 10 instructs the bot to send a signal when the price change exceeds 5%, Open Interest increases by more than 5%, and trading volume grows by 10% - all within a 10-minute period.
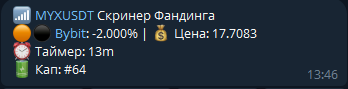
A small but highly useful screener. It allows you to set up notifications for coins with specific funding rates a set amount of time before the funding settlement.
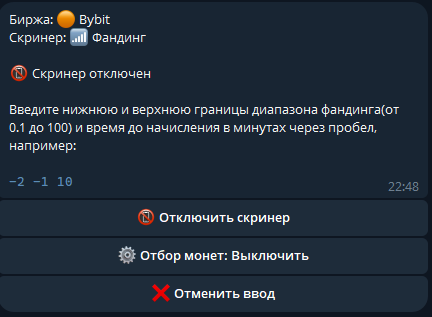
This screener is configured similarly to the others: you enter three parameters — the lower bound of the funding range, the upper bound of the funding range, and the lead time (how many minutes before the funding settlement to receive the signal).
For example, with the settings shown on the left, a signal will be sent 10 minutes before the funding calculation for any coin whose funding rate falls within the -2% to -1% range. (These moments can be opportunistic for opening a long position with a small take-profit).
Please note: The screener checks for a strict match of the funding rate at the exact specified time before settlement. If the funding rate enters the target range after that specific time has passed, a signal will not be triggered for that coin.
Now, let’s talk about the feature that sets these screeners apart from all competitors: Screener Filters. By utilizing additional exchange data (RSI (15m, 1h, 1d), funding rates, 24h volume, volume change over a specific period, and market capitalization), you can filter out unsuitable signals. Simply click the "Filters" button on any screener to view all available filters for the current exchange and their current parameters.
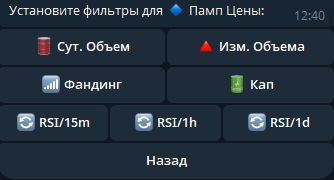
Below are the filters you can configure for this screener:
Volume Change Filter: Helps predict future price movements. For instance, a small price increase accompanied by a significant volume surge (over 30%) may indicate further growth.
RSI Filter: Includes three timeframes (15m, 1h, 1d) to help you filter out overbought or oversold coins.
Market Cap Filter: Allows you to filter coins based on their total market capitalization.
Funding Filter: Enables signals that account for the futures funding rate. For example, it helps you avoid opening short positions when there is a high negative funding rate.
24h Volume Filter: Used to exclude low-liquidity coins with low trading activity.
Specific Capitalization: Allows you to set a custom market cap range for an individual screener. To bypass the global market cap filter from the "Tickers Filters" section, you must disable the Coin Selection filters within this specific screener menu.
Please note that when setting parameters, there are three buttons located below the message text:

Frequently Asked Question: What parameters should I use?
Answer: It all depends on your strategy. The bot provides data, but there is no universal "holy grail" in crypto trading - the market is constantly changing. What works for one coin might not work for another, and strategies successful in one market condition may prove ineffective in another.
A trader's task is to identify setups and assets that provide at least a 50%+ win rate in the long run. Even a ratio of 51% take-profits to 49% stop-losses is already a formula for success (excluding exchange commissions).
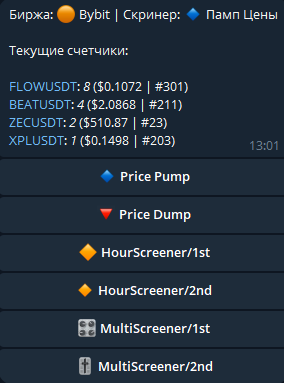
Let’s return to the Bybit main menu. Next, you will see the "Signal Counter" menu item. This is a fairly simple mechanism, the purpose of which is clear from its name: it displays the number of signals received from each screener throughout the day. This information can be useful for identifying currently volatile coins based on your personal parameters. The counter resets every morning at 7:00 AM UTC.
The fourth item in the main menu is Ticker Settings. This is a powerful and essential tool that allows you to adhere to your chosen strategy and keep it free of "garbage" data. Here, you can configure the tickers you track: create either a whitelist or a blacklist, enable or disable filtering for new tickers, and set up their automatic removal from the blacklist. This mechanism applies to all screeners.
Let’s take a closer look at these settings.
The Whitelist contains the tickers selected for monitoring and trading (for example: DOGEUSDT, SOLUSDT, BTCUSDT). If this list is not empty, signals will be generated ONLY for these specific coins and no others. You can manage it using the Whitelist + and Whitelist - buttons, where you must explicitly enter the full name of one or more required futures.
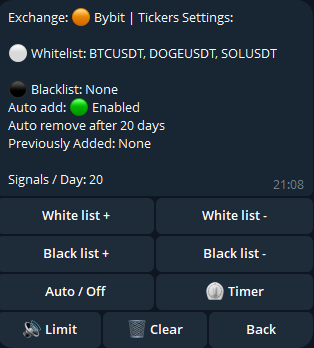
The Blacklist allows you to specify tickers for which you do not want to receive notifications. Keep in mind that the list of allowed coins has priority in the filtering order: if the whitelist is not empty, the bot will process a signal only if the coin is present in that list, without proceeding to other filters. You can manage this via the Blacklist + and Blacklist - buttons, where you can enter the ticker in any convenient format—either the full name (BTCUSDT) or a short version (btc).
The bot also features automatic blacklisting of new tickers following listing or delisting announcements. This function was implemented to exclude new tickers from trading, as they often exhibit highly unpredictable behavior. Such tickers are placed in a separate blacklist, from which they can be automatically removed after a set number of days (configured via the Timer button). The function itself is toggled using the Auto button in the menu; by disabling it, you will receive signals for new coins without any restrictions.Signals / Limit: The maximum limit of signals for each ticker within each screener per day.
Since the bot collects data from multiple exchanges, I have expanded its functionality to include inter-exchange arbitrage, starting with funding rate analysis. This allows you to find "risk-free" hedged strategies, such as simultaneously opening long and short positions on different exchanges.
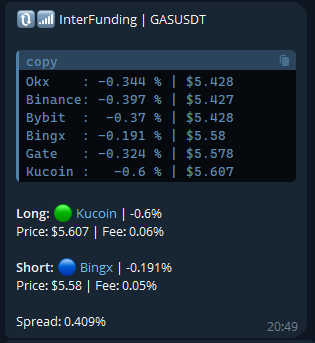
🔍 How does it work? The bot analyzes funding rates across various exchanges to help you identify profitable trading pairs. For example, in the screenshot on the right, the bot analyzed 6 exchanges for the GASUSDT contract. 10 minutes before the funding settlement, it suggested:
Opening a Long position on KuCoin with an expected profit of +0.6% from the position.
Opening a Short position on BingX, where a funding fee of -0.2% will be collected.
By opening a long and a short position at the same time, we neutralize the coin's price fluctuations and profit solely from the difference in funding rates.
Such opportunities occur regularly, and it is not uncommon for the funding rate spread toreach 1.5–2% or even more. The situation is even more favorable if the price on the exchange with the higher funding rate is lower than on the exchange with the lower rate. In this case, an additional source of income emerges — price convergence.This method allows you to minimize risks and generate profits even in highly volatile market conditions. The bot performs all calculations automatically, providing you with clear and timely trading signals.
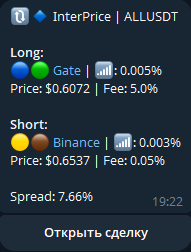
The InterPrice screener monitors price discrepancies for identical contracts across all integrated exchanges. Once per minute, the bot analyzes tickers listed on at least two exchanges. It compares the findings with your threshold and sends a signal if the spread exceeds your specified limit.
For convenience, an Open Trade button has been added. This allows you to instantly open two positions on the specified exchanges in the correct directions, provided you have their connected instances configured.
As mentioned previously, the bot offers extensive capabilities for interacting with various exchanges and can be used for several different scenarios:
To use any of these features, you will need to generate API keys on the exchange and link them to the bot. It is important to note the following:
! By linking your keys, you grant the bot the ability to trade with your funds. The keys are managed by the user, and the specific permissions for account actions are also set by the user. You can delete keys and create new ones at any time; however, the user bears full responsibility for the safety of funds on the account. I recommend keeping this in mind and starting your trading with a minimum deposit to observe how the bot behaves in various scenarios.
Let’s return to the main menu and select Trading. We will briefly go over the main elements found here, and a more detailed breakdown with examples will be provided below.
Now, let’s take a closer look at each item in more detail:
Please note that the settings for Long and Short positions are identical; the current selection is displayed after the Action button. For convenience, we will go through all the settings using Long positions as an example.

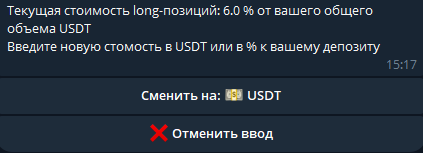
Opening position size: set either as a percentage of your total balance (available + in positions) or as a fixed amount in USDT. When configuring this, you enter the numerical value and then select the units (percentage or USDT) using the button in the drop-down message.
Order type for opening: limit or market. Trading with limit orders saves on fees and eliminates slippage. The downside is that there is no guarantee the position will open. In my experience, about 70–80% of orders are filled, depending on the signal type. Market orders open a position immediately, but the trade-offs include higher fees and slippage.
When a limit order is selected, two additional settings appear: Timer and Price Delta.
The Timer allows you to specify how long the bot should wait before canceling an unfilled order. This is necessary to avoid opening a position based on an outdated signal when the market situation has already changed.
The Price Delta allows you to "shift" the order placement by a certain percentage from the contract price indicated in the signal. You can move it up (using a positive value) to increase the chances of the position opening, even if it slightly worsens the entry point. Alternatively, you can move it down (using a negative value) if you expect the price to continue dropping after the signal is received.
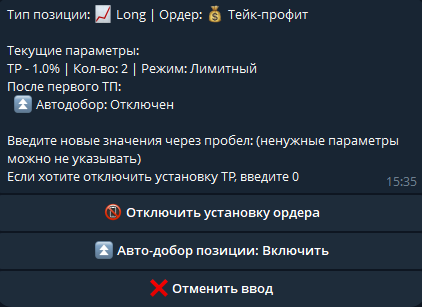
This setting provides flexible management of take-profit orders and their behavior. When configuring, you need to specify from 1 to 3 parameters.The first parameter indicates at what level (in % from the entry price) the order should be placed.With the second value, you can specify the number of TP orders (up to 5). In this case, the position will be divided into equal parts, and the TP orders will be placed at equal intervals from each other. The default value is 1 order.The third value sets the trailing (slippage) for the TP order. The default is 0, in which case the TP will be a limit order. If you explicitly set this third parameter, the TP will open as a trigger order, and the specified value will act as a callback from the best price at which the order is triggered.
There is no need to dwell on a single TP order, as its logic is straightforward: when triggered, the entire position is closed. The behavior of a grid TP is slightly different: when one of the grid orders is filled, the position volume decreases as a portion of it is closed.
The bot accounts for this by automatically recalculating both the averaging orders (which are based on the current position volume) and the stop-loss order. This applies, of course, if these orders are set. Additionally, the logic for the stop-loss is directly tied to the execution of grid TP orders, which will be covered in the corresponding section.
The Refill feature can significantly improve your trading results. Its logic is as follows: after one of the grid TP orders is triggered and a portion of the position is closed, a limit order is placed to refill that same volume back into the position.
The placement price is calculated from your entry price (EP): EP minus deviation (or EP plus deviation for shorts). If the deviation is set to 0, the order is placed exactly at the entry price. When the next grid TP triggers, the previous refill order is canceled and replaced by a new one that accounts for the combined volume of both triggered TP orders. This cycle continues until the position is fully closed.
If the price moves back and the auto-add order is filled, the current entry price of the position improves. This leads to a repositioning and recalculation of the averaging grid while maintaining the remaining number of averaging steps. For example, if 1 out of 4 averaging orders had been used, the new grid will be recalculated based on the 3 remaining orders.
Why use this feature?
It allows you to gradually shift your position to a more favorable entry point as the price fluctuates within a channel-acting like mini-averaging trades. Additionally, it enables you to consistently lock in profits through grid TPs. Most importantly, this feature does not increase the overall risk of the position, as the logic only activates after a grid TP has triggered (i.e., when the position is being deleveraged).
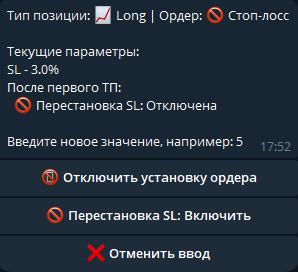
Specify a single value - the level for placing the stop-loss. It is set as a trigger market order. Previously, limit orders were used, but with limit trigger orders, there is a risk of non-execution, which is critical for stop-losses.
Pay attention to the Replace SL setting. When enabled, you can define a new position for the stop-loss order once a grid take-profit (which we discussed earlier) is triggered. This allows you to move the SL order to break-even (by setting a deviation of 0) or any other preferred level after a TP order is executed.
Working with averaging is extremely dangerous and requires at least a minimum level of experience. Improper averaging can lead to the liquidation of a position or your entire deposit, so please read carefully!
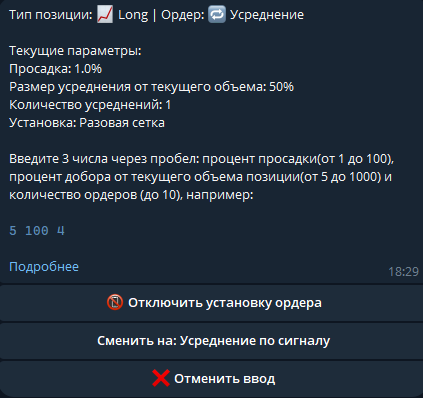
There are three operating modes: Step-by-Step Averaging, One-time Grid, and Signal-based Averaging. First, let's look at the first two, as they have much in common except for a couple of nuances.
General Principles: When configuring, you specify three parameters: the drawdown percentage for placing an order, the add-on size as a percentage of the current position size, and the total number of averaging steps in the grid. For example, if you enter 10 100 4, the bot will create a grid of 4 averaging orders, each placed 10% apart, with each order equal to 100% of the current position's volume.
Now, let's look at the differences:
Step-by-Step Averaging: In this mode, only one averaging order (the first of the four) is placed at a time. Once it is filled, all stop orders (TP and SL) are removed, and the position information - such as volume and entry price (EP) - is updated.
Following this, a new SL order is placed at a new level based on the updated EP and volume. The next averaging order is then taken from the previously calculated grid (for instance, its placement point would be 20% from the original EP). This process repeats cyclically until all orders in the grid are exhausted or until there are insufficient funds to place a new order.
One-time Grid: In this mode, all averaging orders are placed simultaneously, and the grid is filled immediately. For example, with settings 10 100 4, the bot will place 4 averaging orders at once, with each subsequent order accounting for the volume of the previous ones.
If your initial position is 10 coins, the first averaging order will be for 10 coins (since the second parameter is 100%, meaning we add the exact same amount). The next order will be 20, the following 40, and the final one 80. Please note that in this mode, the Stop-Loss order will not change its price level; only its volume will be updated to match the growing position.
When performing manual averaging (either directly on the exchange or via the bot), all currently placed orders will be canceled, recalculated, and replaced based on the new position volume. The averaging grid itself remains unchanged.
Each method has its pros and cons. Step-by-step averaging allows you to avoid "freezing" all your funds in open orders at once; however, during high volatility or with very small offsets between orders, the bot might not have enough time to place the next averaging order. The One-time Grid, on the other hand, will reserve all necessary funds in orders immediately. This provides more complete control over the position and ensures you won’t miss fast, volatile price movements.
I would also like to cover the third type of averaging, which some may find useful: Signal-based Averaging. This is an experimental mode where the grid calculation and placement of limit orders do not occur. Instead, the position will only be added to when a signal is received from the screeners for a coin that already has an open position.
In the first two modes, if a signal is received for an already open position, the bot will simply notify you that the position is open and take no action. In Signal-based Averaging mode, however, the bot will open a new trade that is "added" to the existing one.
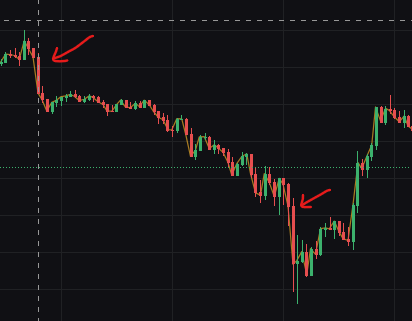
What is the core idea? Markets often experience a prolonged decline lasting several days, followed by a sudden, sharp drop (a "dump") that liquidates many traders. The idea is to avoid averaging in "the middle of nowhere" while a coin slowly slides down. Instead, you add to the position precisely at the moment of a strong downward spike, which is often followed by a rebound in the opposite direction.Important Note: In this mode, your screeners should be configured to catch strong, significant movements rather than every minor signal, as the number of such additions is not limited by a pre-set grid.
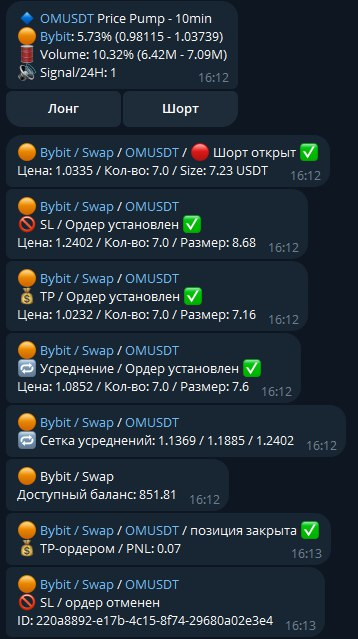
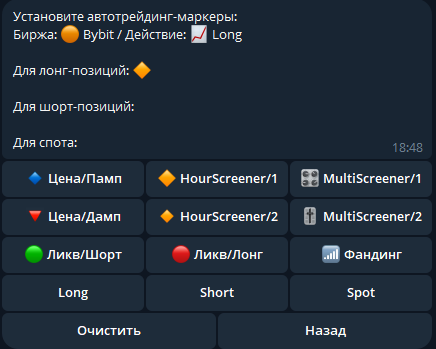
This tool allows you to configure the bot's behavior based on incoming signals. You can specify which signals should trigger automatic Long or Short positions, so you only need to check the bot or the exchange to monitor the overall situation.The image above is a great example of why you need a bot: receiving a pump signal, opening a position, and hitting a 1% take-profit target—all happening within a single minute.
How to Configure? Navigate to Autotrading -> Set Markers and select your exchange. You will see configuration options for various actions: opening Long positions, Short positions, or Spot buys. As you may have noticed, every signal from the screeners has its own unique marker (the icon at the beginning of the message):
🔹 — Price Pump
🔻 — Price Dump
🔶 — HourScreener 1st
🔸 — HourScreener 2nd
🔴 — Long Liquidation
🟢 — Short Liquidation
🎛 — MultiScreener 1st
🎚 — MultiScreener 2nd
These markers are exactly what you need to specify for the bot: which signals will trigger a Long, which will trigger a Short, and which will initiate a Spot purchase (if you have linked a spot exchange).
To get started, I recommend trying to open Long positions following price drawdowns or short liquidations. In this case, under the Long Markers section, you should specify two markers: the green circle for short liquidations and the red inverted triangle for price dumps. For ease of use, the menu is dynamic, allowing you to see instantly which markers are assigned to which position types. In the example on the right, the HourScreener 1st signal is configured to open Long positions on the Bybit exchange.
This menu allows you to manage your exchange connections, as well as save or delete the API keys used to encrypt your connection session. To connect an exchange, you must first enter your API keys.
If you do not have them yet, you will need to generate them on the exchange’s website.
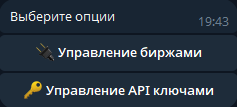
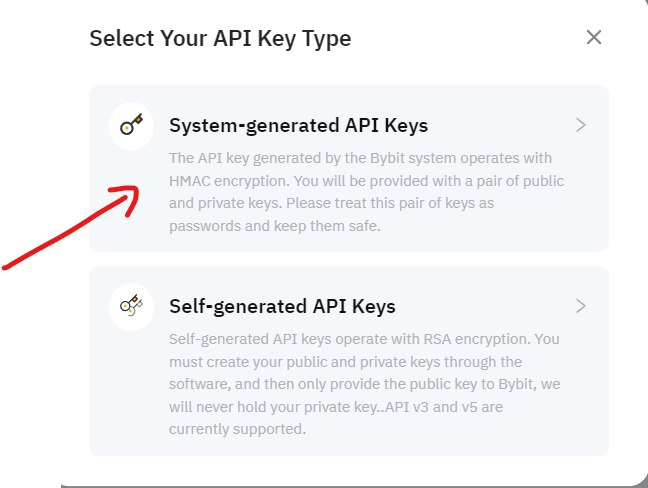
Please read the following instructions carefully. Click on Markets Menu and select "Create API Keys". Here, you will need to choose the exchange you wish to connect.We will use Bybit as an example for our key creation recommendation. Bybit offers the option to create Sub-accounts (typically used for copy-trading). You can create a sub-account or trade from your main account—the choice is yours. Once your account is ready, deposit a minimum amount and generate your keys in the API Management menu (bybit.com/app/user/api-management) by clicking "Create New Key".
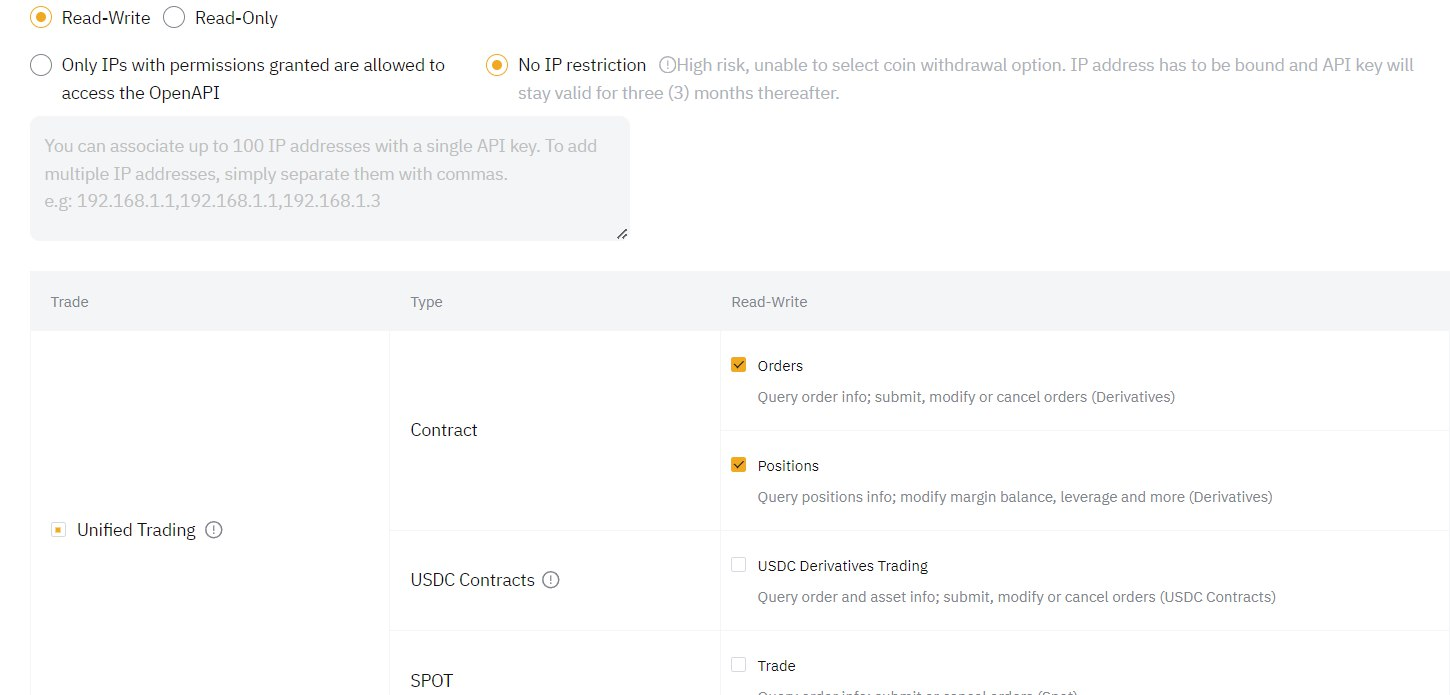
When creating your keys, pay close attention to the "Assets" section. Ensure that no boxes are checked in this category. If enabled, these permissions could allow funds to be withdrawn from your account. Although your keys are stored in our database in an encrypted format, we prioritize your security—so only select permissions related ONLY to trading.
Once created, you will receive a pair of keys: API-KEY and API-SECRET (some exchanges may provide additional parameters). Make sure to save them in a secure place.
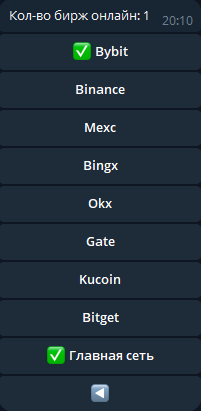
Click "Set API Keys", select your exchange, and enter your API Key followed by your Secret Key. After that, go to the Exchange Management menu and select the exchange you wish to connect. Upon a successful connection, a green checkmark will appear next to the exchange name, and a notification displaying your current available balance will be shown below.
Testnet (Demo Trading) Please note that you can also generate keys within the exchange's Testnet to trade using a "demo balance." The process for generating and entering these keys is exactly the same, except you must select "Testnet" when connecting.
Note: The bot previously offered spot trading, but this feature has been removed due to low demand.
In addition to its extensive trading configurations, the bot features a user-friendly interface for managing active trades. By clicking the "Positions" button, you will receive a complete list of all open positions across all connected exchanges.The default view is minimalist, providing all the essential data at a glance: Current Entry Price (EP), Position Volume (in USDT), Current Asset Price, Target Price (Take Profit), PNL (Profit and Loss)
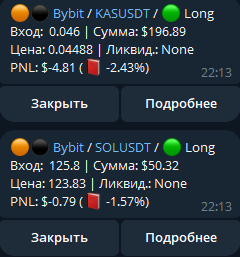
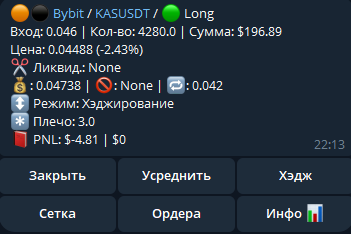
If needed, you can access more in-depth information about a specific trade by clicking the "Details" (Подробнее) button.
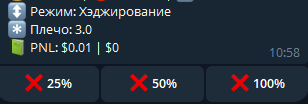
You also have the ability to perform a variety of actions directly on an active position:
Close: Options for partial closure (25%, 50%) or closing the position entirely.
Averaging: Manually add to your position by 100%, 200%, 400%, or 500% of its current volume.
Hedging: Instantly open an identical position in the opposite direction to mitigate risk or lock in current values.

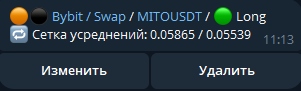
Clicking the "Grid" button will display the current averaging grid for that specific position. In this menu, you can manually edit the grid by entering the specific price levels or values you need, separated by commas.
If you want to prevent the bot from placing new averaging orders after the current ones are filled, simply click the "Delete" button.
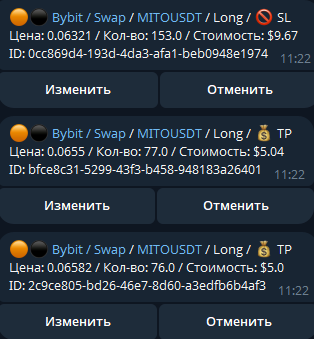
Clicking the "Orders" button will display all active orders currently placed for that specific position. From this list, you can delete or modify any order by clicking the corresponding button next to it.
When you click "Modify", the bot will ask which parameter you wish to update: Price or Volume.
Since most exchanges do not support direct order modification via API, the bot handles this by canceling the original order and immediately placing a new one with your updated parameters.
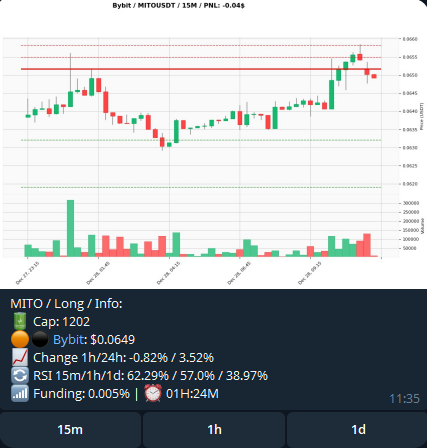
One of the most frequently used features is the "Info" button, which provides a graphical representation of your position on a chart. It is always helpful to visually assess the current state of a trade in context rather than relying solely on raw data.
You can customize the chart by selecting different timeframes: 15-minute, 1-hour, or Daily candles. The current PNL of the position is displayed at the top of the chart, while your active orders are clearly marked with dashed lines across the price levels.